🧱 Docker on a Pi – Phase 3: From SQLite to PostgreSQL with Flask
In Phase 3, we go from SQLite to PostgreSQL — adding a real database, Docker networking, and .env config to our Pi-powered stack.

So far, we’ve got a Flask app in a container, persistent logging, and a second container tailing those logs.
Now we build around the data.
🎯 What’s the Point of Phase 3?
Up to this point, we’ve logged requests, but we haven’t stored anything useful. That changes now.
In this phase, we:
- Add a real SQLite database
- Store data inside the Flask container
- Test querying + inserting
- Use volume mounts so the data actually persists
- And build the foundation for PostgreSQL in the next round
🧠 TL;DR
This phase is about working with real data
before wiring up real database containers.
We’ll start simple with SQLite (zero config), and then level up to PostgreSQL for the full service experience.
📂 Where We’re Starting From
Before we jump in, here’s what your project directory should look like if you’ve followed Phases 1 and 2:
docker-dns-dashboard/
├── app.py
├── docker-compose.yml
├── Dockerfile
└── logs/
    └── app.log

get-docker.sh

3 directories, 5 files
This is where we pick up — and now we’re going to start storing actual data.
🧱 Step 1: Update the Dockerfile
We need to install SQLite in the Flask container.
nano Dockerfile
FROM python:3.9-slim

WORKDIR /app

COPY app.py .

RUN pip install flask

# Add SQLite tools
RUN apt-get update && apt-get install -y sqlite3 && apt-get clean

CMD ["python", "app.py"]
RUN apt-get install -y sqlite3 is installing the SQLite CLI tool inside the container, not on your Pi. This allows the Flask app to create and manage .db files from within the container itself.🐍 Step 2: Update the Flask App to Use SQLite
Here’s a simplified version of app.py that:
- Creates a SQLite database if it doesn’t exist
- Adds a
visitstable - Increments a counter every time someone hits the site
nano app.py
from flask import Flask
import sqlite3
import os

app = Flask(__name__)

DB_PATH = '/app/data/site.db'

def init_db():
    conn = sqlite3.connect(DB_PATH)
    c = conn.cursor()
    c.execute('CREATE TABLE IF NOT EXISTS visits (count INTEGER)')
    c.execute('INSERT INTO visits (count) SELECT 0 WHERE NOT EXISTS (SELECT 1 FROM visits)')
    conn.commit()
    conn.close()

@app.route('/')
def index():
    conn = sqlite3.connect(DB_PATH)
    c = conn.cursor()
    c.execute('UPDATE visits SET count = count + 1')
    conn.commit()
    c.execute('SELECT count FROM visits')
    count = c.fetchone()[0]
    conn.close()
    return f"Hello from Flask on a Pi! You've visited this page {count} times."

if __name__ == '__main__':
    os.makedirs('/app/data', exist_ok=True)
    init_db()
    app.run(host='0.0.0.0', port=5000)
📦 Step 3: Mount a Volume for SQLite Data
Update your docker-compose.yml to reflect the addition of: ./data:/app/data
services:
  dns-dashboard:
    build: .
    container_name: dns-dashboard
    volumes:
      - ./logs:/app/logs
      - ./data:/app/data
    ports:
      - "5000:5000"

  log-watcher:
    image: busybox
    container_name: log-tail
    volumes:
      - ./logs:/logs:ro
    command: tail -f /logs/app.log
Now your SQLite DB (site.db) lives in the ./data folder on your Pi — not inside the container. This means it’ll persist between rebuilds and restarts.
🚀 Step 4: Rebuild and Run
docker compose up -d --build
Then open:
http://<pi-ip>:5000
Each refresh will increase the count stored in SQLite.

🔍 Verifying the Database
💡 Pro Tip: Check from the Container First
Before installing SQLite on your Pi, try querying the DB from inside the container:
docker exec -it dns-dashboard sqlite3 /app/data/site.db "SELECT * FROM visits;"

If it works there — your DB is fine and the volume mount is solid.
No need to install anything on the host...
Unless you want extra visibility or backup access.
Which, of course, we are going to do. 😆
Now, lets install sqlite3 to view from the host (Pi):
sudo apt update
sudo apt install sqlite3
Then, from inside ~/docker-dns-dashboard run:
sqlite3 data/site.db "SELECT * FROM visits;"

You should be able to query the database from both host and container — and see the same result:
✅ Now, Confirm DB Works on the Pi (Even If Container Is Down)
This proves the volume-mounted site.db is persisted correctly on the host (your Pi):
# Make sure the container is stopped
docker compose down

# Check if the DB file exists
ls -lh data/site.db

# Query it directly from the Pi
sqlite3 data/site.db "SELECT * FROM visits;"

🔥 Let’s gooo!
You've now proven:
| ✅ Works in Container | ✅ Works on Host | Outcome |
|---|---|---|
| Flask writes DB ✔️ | Pi reads DB ✔️ | Volume mount is working perfectly |
| DB persists ✔️ | Schema intact ✔️ | Real, inspectable stateful service |
🧠 Why SQLite First?
We’re not skipping ahead to PostgreSQL because:
We didn’t skip ahead to PostgreSQL right away for a reason:
- SQLite is easy to prototype
- Zero config = less room for failure
- You’ll understand the difference when we switch to Postgres
And when we do?
The core logic — connect(), execute(), etc. — doesn’t change much.
Just the backend does.
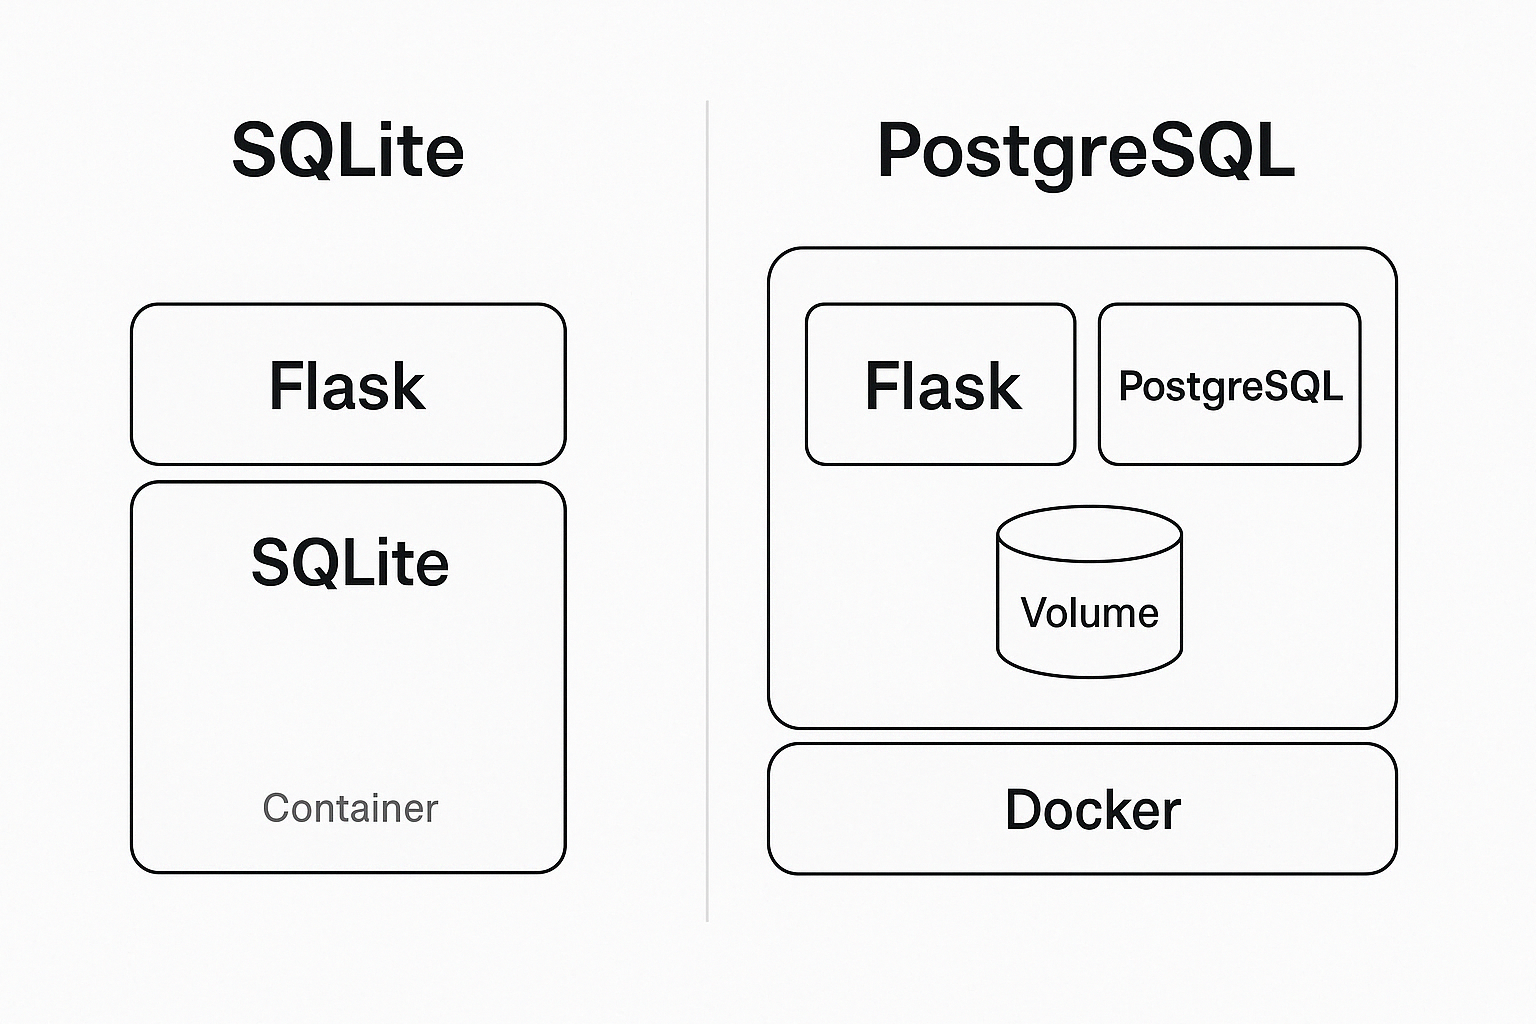
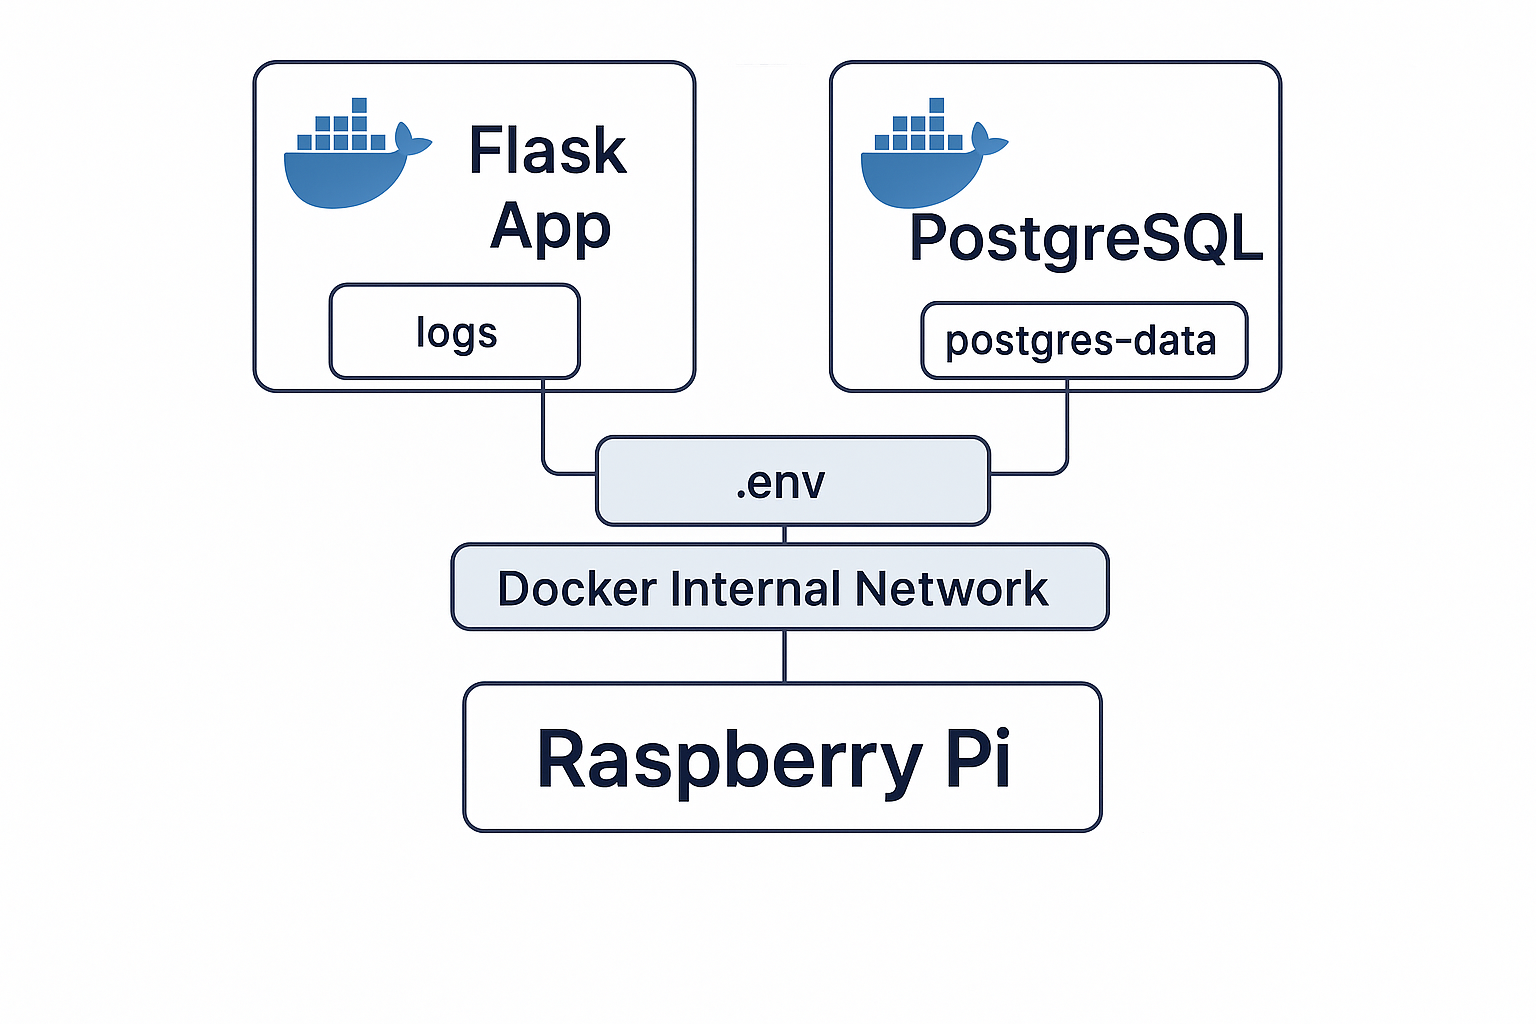
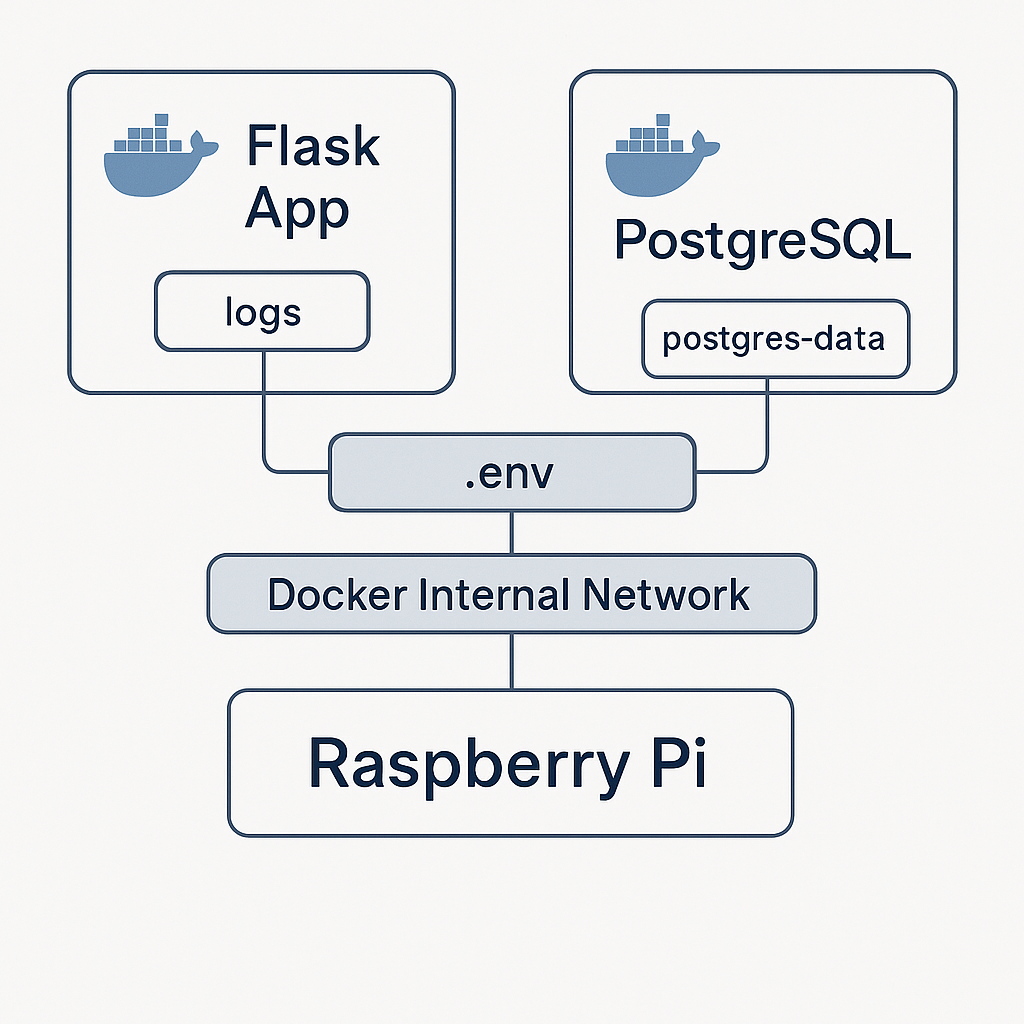
🧱 Phase 3B – Upgrading to PostgreSQL (Because We’re Grown Now)
Now that we’ve proven the SQLite setup works and our app is writing real data, it’s time to level up to PostgreSQL — a production-grade database engine.
We’ll do it the right way:
- As a separate container
- Connected over Docker’s internal network
- With clean config handled by a
.envfile - And running with PostgreSQL, Docker networking, and restart policies
🛠️ Step 1: Add PostgreSQL to Docker Compose
Let’s start by adding a postgres container.
First, create a .env file in your project root:
POSTGRES_USER=dashboard
POSTGRES_PASSWORD=supersecure
POSTGRES_DB=site_stats
Then update your docker-compose.yml:
services:
  dns-dashboard:
    build: .
    container_name: dns-dashboard
    ports:
      - "5000:5000"
    depends_on:
      - db
    volumes:
      - ./logs:/app/logs
      - ./data:/app/data
    env_file:
      - .env
    restart: unless-stopped

  db:
    image: postgres:16
    container_name: postgres-db
    restart: unless-stopped
    env_file:
      - .env
    volumes:
      - postgres-data:/var/lib/postgresql/data

  log-watcher:
    image: busybox
    container_name: log-tail
    volumes:
      - ./logs:/logs:ro
    command: tail -f /logs/app.log

volumes:
  postgres-data:
📦 What This Does:
- Spawns a real PostgreSQL database container using your
.envconfig - Keeps it isolated but connected to Flask via Docker’s internal network
- Ensures containers are restarted if they fail
✅ Flask will talk to Postgres using this connection string (you’ll use it in app.py):
postgresql://dashboard:supersecure@db:5432/site_stats
Breakdown:
dashboard→ usersupersecure→ passworddb→ hostname (Postgres service name in Compose)5432→ default Postgres portsite_stats→ database name
📡 WIRED.
🐍 Step 2: Update app.py to Use PostgreSQL (via psycopg2)
psycopg2?psycopg2 is a popular PostgreSQL adapter for Python.It allows your Flask app to connect to and communicate with your Postgres database — run queries, create tables, insert data, etc.
We're updating app.py to use PostgreSQL instead of SQLite, and to do that, Flask needs the psycopg2 Python library.
But because this app runs inside a container, we need to add psycopg2 to the container image by updating the Dockerfile.
🛠️ We’re keeping SQLite tools installed for now in case we want to compare or switch modes later.
Just add the following line right afterpip install flask:
RUN pip install flask psycopg2-binary
📄 Now Replace app.py with Postgres Logic
from flask import Flask
import psycopg2
import os

app = Flask(__name__)

DB_HOST = os.getenv("POSTGRES_HOST", "db")
DB_NAME = os.getenv("POSTGRES_DB", "site_stats")
DB_USER = os.getenv("POSTGRES_USER", "dashboard")
DB_PASSWORD = os.getenv("POSTGRES_PASSWORD", "supersecure")

def get_connection():
    return psycopg2.connect(
        host=DB_HOST,
        database=DB_NAME,
        user=DB_USER,
        password=DB_PASSWORD
    )

def init_db():
    conn = get_connection()
    cur = conn.cursor()
    cur.execute("""
        CREATE TABLE IF NOT EXISTS visits (
            count INTEGER
        )
    """)
    cur.execute("SELECT COUNT(*) FROM visits")
    if cur.fetchone()[0] == 0:
        cur.execute("INSERT INTO visits (count) VALUES (0)")
    conn.commit()
    cur.close()
    conn.close()

@app.route('/')
def index():
    conn = get_connection()
    cur = conn.cursor()
    cur.execute("UPDATE visits SET count = count + 1")
    conn.commit()
    cur.execute("SELECT count FROM visits")
    count = cur.fetchone()[0]
    cur.close()
    conn.close()
    return f"Hello from Flask with PostgreSQL! You've visited this page {count} times."

if __name__ == '__main__':
    init_db()
    app.run(host='0.0.0.0', port=5000)
✅ This Does:
- Connects to your Postgres container via the Compose-defined service name
db - Creates the
visitstable if it doesn’t exist - Inserts a row if empty
- Increments and returns the count on every request
1️⃣ We Can Now Rebuild & Relaunch:
Since we updated both the Dockerfile (new dependencies) and app.py, we need to rebuild the container:
docker compose up -d --build
2️⃣ Check Everything Is Running
Run:
docker ps
You should see:
dns-dashboard(your Flask app)postgres-dblog-tail(optional)

3️⃣ Check the Logs for Errors
docker logs dns-dashboard

Look good!
4️⃣ Hit the App in the Browser
http://<pi-ip>:5000
You should now see the updated response:
"Hello from Flask with PostgreSQL! You've visited this page X times."
Each refresh should increase the count — now from Postgres, not SQLite.

5️⃣ Verify the Data in PostgreSQL
From inside the container:
docker exec -it postgres-db psql -U dashboard -d site_stats
Once inside the prompt:
SELECT * FROM visits;
You should see a single row with the current visit count — proof that your app is reading/writing to PostgreSQL via Docker’s internal network, using the shared .env config.

Quick reference:
| Command | What it does |
|---|---|
\q | Quit psql |
\dt | List all tables |
\? | Show help menu |
✅ This means Phase 3 & 3B is complete!🎉
.env config — all on a Raspberry Pi.☕ Until Next Time
With SQLite in the rearview and PostgreSQL now containerized, connected, and working end-to-end, Phase 3B wraps up strong.
You now have:
- ✅ A multi-container stack with Flask and PostgreSQL
- ✅ A shared
.envconfig across services - ✅ Restart policies
- ✅ Volume-mounted persistent database
- ✅ Clean Docker networking using service discovery
This isn’t just a test environment anymore — this is a real microservice running on your Pi.
Up next in Phase 4, we’ll build on this foundation with:
- 🔐 Docker network segmentation and firewall logic
- 📡 External access control + internal-only services
- 🧱 Optional monitoring or metrics containers
Until then — subscribe, experiment, and keep stacking.
✌️ Out.
📩 Missed earlier phases?
Catch up here: